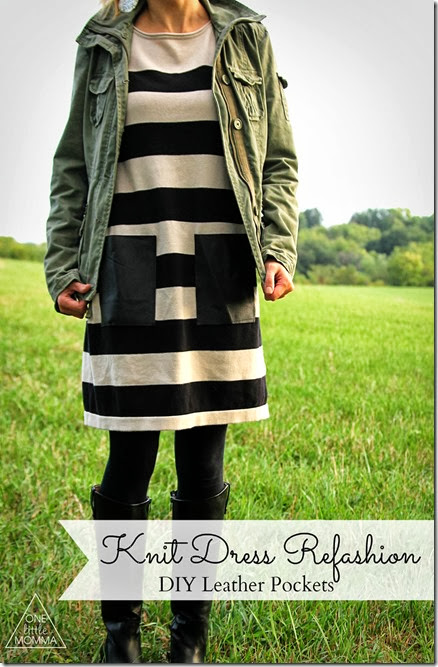
DIY Leather Pockets- Knit Dress Refashion
A huge trend this Fall is leather- leather details, leather jackets, leather pants and even accessories. Besides blogging, you know I run an Etsy shop called ONE little BELT where we sell leather belts for babies and toddlers. I also sell cuffs and other leather jewelry here. Because of our businesses, we happen to have a lot of leather scraps laying around and we are always looking for ways to use them. I saw this photo a few weeks back and knew I had to add my own leather pockets to a dress! It was surprisingly easy and I'm going to show you how to do it too!
First you need to find the right knit dress. I think a solid would also work great. You could try a printed dress if you want to get crazy. You could do a maxi or a mini, but I found one that was pretty similar to the one in the photo. (Mine is from H&M.) Next find your leather or PU leather. Check out your local fabric store for faux leather or maybe even some real leather. We got ours from a leather store which sells scraps for pretty cheap. Garment weight is ideal, but really whatever feels right to you will work.
Next choose your pocket size. I cut some first and then realized that I wanted them much bigger! The size I ended up with was 5.5 x 7 inches. My husband helped me cut them because I have issues with measuring and cutting straight lines. We used a rotary cutter to cut it.
Be sure to clean up the edges with some scissors for a cleaner cut.
Because I was sewing thick-ish leather to a knit, I backed it with heavy interfacing. Just cut the interfacing the same size or a little bigger than the leather. Then pin the leather and the interfacing in place. The leather goes on the outside and the interfacing goes on the inside.
I used my regular sewing machine and needle for this project. I used a long straight stitch and went very slowly. Sew down each long side and then the bottom of the pocket. I didn't do a perfect job and got a little bit of bunching, but the pocket still lays flat enough that I didn't bother unpicking it.
After I sewed both pockets in place I turned the dress inside out and you can see where I sewed the interfacing. And you can see how NOT PERFECTIONIST I am. I cut off the excess interfacing and turned it right side out.
And that is it! The hardest part is getting the placement right and making sure you sew the pockets down flat. I am really happy with the result! It adds just the right touch to this dress and goes great with my cuff! I styled this dress with tall black boots, tights and a military jacket. I can't wait to wear it more this Fall and Winter!
I'd love for you to stop over and check out my DIY hexagon elbow patches and no-sew knit vest tutorials for other Fall style project inspiration!


